
Last year when I was working on the official Nutanix stencil set, I discovered a new way of reducing the size of complex (background) images. In post Visio by DPTPB: Reducing size of complex Visio shapes V2 I described how to:
- Take an existing single object Visio background image
- Ungroup it to many individual Visio objects
- Make required changes to individual objects or add new individual objects
- Convert group of individual images back to single image again
Above technique is based on using “Windows Enhanced Metafile” images and “Paste Special” feature.
Why is this technique beneficial?
Resulting single object image is (much) less complex and (much,much) faster to use than image made of multiple objects. A good way to optimize your complex Visio shapes (and reverse engineer and modify existing third party Visio shapes).
Unfortunately there was a tiny issue with the solution…
Alignment box is too large…
There was still one minor issue that I couldn’t figure out how to solve. Whenever you pasted the image back as Windows Enhanced Metafile, the dimensions of resulting image were slightly larger than the original image. This was because for some unknown reason Visio adds some slack between the actual image and the alignment box around the image. Additionally the image is not centered within the alignment box.
Visimation, who originally described the “Windows Enhanced Metafile + “Paste Special” technique their blog post ,also touched briefly the subject of making alignment box smaller, but did not describe the actual steps how to do it.
The extra slack and offcentered positioning causes some problems with positioning the image. You can not use formulas like “parentshape.width*0.5” and parentshape.height*0.5 to position the image exactly in the middle of a parent shape. If you try to, the image won’t land in the position you desire, as there is a small offset in both X and Y axis.
While not a huge problem as you can manually position the image roughly in the middle of the parent shape, but still mildly annoying.
Since having a slightly too large alignment box for Windows Enhanced Metafile images was not that huge problem, I didn’t spend too much time by figuring out how to fix it and quickly moved on.
Crop tool
Few days ago I was watching television and browsing through Visioguy forums with my phone. I was looking for solution for totally unrelated issue and stumbled on discussion where someone was talking about using Visio tool called “crop”.
While fairly familiar with Visio, I had never used this tool and had never even heard about it. On the following day I got back to my computer and tried to find the menu where “Crop” tool is, I soon realized why:
The menu for “crop” tool is hidden most of the time
“Crop” tool is part of “Picture Tools” set, found under Visio ribbon bar tab “Format”. The strange thing is that “Picture Tool / Format” tab is only visible when an object of “picture” type is selected.
example: Visio ribbon bar without “Format” tab

- A non-picture type object selected, like normal Visio shape
- “Picture Tools / Format” is not visible
example: Visio ribbon bar with “Format” tab

- A picture type object selected, like Windows Enhanced Metafile image
- “Picture Tools / Format” is visible
example: “Crop” tool in “Format” tab

Problem with the alignment box
Before getting into using “Crop” tool, let’s investigate why using “parentshape.width*0.5” or “parentshape.height*0.5” formulas won’t work with pasted “Windows Enhanced Metafiles” images.
example: original shape & dimensions of the shape

- I have opened a group containing multiple small objects with right-click menu item “Open xxx group”
- this image was previously a single object image, which was ungrouped
- I have selected the outermost shape of the group of objects
- In “Size & Position” window you can see the dimensions of the select shape shape (Height & Width)
- You can make a single object “Windows Enhanced Metafile” image by
- closing the group edit window
- selecting the single object image
- selecting in right-click menu
- copy
- paste special – Picture (Enhanced Metafile)
example: resulting image & dimensions

- As you can see both “Width” and “Height” are now slightly larger than with the original image
- Caused by additional slack between the image and the surrounding alignment box
- While zoomed out the slack between the image and surrounding alignment box doesn’t seem that large and it seems that the image is centered within the alignment box
- In fact it is NOT centered and there are slight offsets both in x and y axis as seen in the examples below
example: bottom left corner of example above at 6400% zoom

- the thin line with “white circle” is the alignment box
- the thicker line black line is the edge of the actual image
- the gap between the alignment box and the bottom of the image is smaller
- than the gap between the alignment box and the left side of the image
example: top left corner of example above at 6400% zoom

- The gap between the alignment box and the top of the image is slightly larger than the gap in the bottom
example: top right corner of example above at 6400% zoom

- The gap between the alignment box and the right side of the image is slightly smaller than the gap on the left side
Example: Using simpler shapes to better illustrate what is happening

- Green rectangle = The optimal place where the metafile image should land
- If there was no extra slack and offcentered placement
- Red rectangle = Where the metafile actually lands
- Little bit too high and too much right
- Caused by the extra slack and offcentered placement
Example: the same example as above, but with extra slack cropped a way

- Now the extra slack has been cropped a way
- And the Red rectangle is nearly perfectly overlapping the green rectangle
- Not a perfect crop as there is a very small difference in overlapping and the Red rectangle sit a tiny bit higher than the green rectangle
Conclusion:
When a “Windows Enhanced Metafile” image is pasted, the dimensions increase and the actual image within the alignment box is NOT centered and there is a slight offset. As a result you have to manually position such “Windows Enhanced Metafile” image when used as a subshape with in a group.
Using Crop tool to get rid of extra slack
While this solution is not perfect (yet?), you can get rid of most of the slack and offcentered positioning.
Why isn’t it perfect
- The perfect solution would be that pasting “Windows Enhanced Metafile” would not add extra slack around the image to begin with
- or that there would at least be option to remove the “Alignment Box” or make it the same size as the original image
- The cropping process seems to be manual operation with your mouse and it is hard to remove 100% of the slack
- Maybe there is a window where you can crop by using numbers: X, Y, width, height . And make the cropping process more exact, but unfortunately I haven’t found such a window
example: Start by selecting your “Windows Enhanced Metafile” picture

- Notice the gap between the alignment box and the actual image
example: use “Picture Tools / Format / Crop”

- small black “handles” appear
- by moving those “handles” you can crop the image
- I normally work with my shapes at 400%-1200% zoom level, getting more accurate results requires zooming in
example: bottom left corner when zoomed at 6400%

- You can crop by clicking the crop handle and moving your mouse
example: bottom left corner & crop handle moved slightly

- crop handle moved towards the corner of the actual image
example: bottom left corner cropped

- Try to position the “handle” in way that it intersects the actual image (thicker black line)
- and
- Repeat for the remaining corners
example: finished cropped image

- Crop tool “handles” now intersect with the actual image
- select some other shape and reselect you cropped image again
example: finished cropped image & alignment box

- As result, most of the slack has been removed
example: the”Width & Height” of the actual image within non-cropped image

example: the “Width & Height” information of cropped image
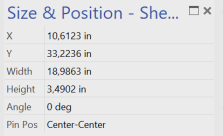
- Not a perfect crop, but close enough
- Width difference = 18,9863 – 18,9795 in = 0,0068 in
- Height difference = 3,4902 – 3,4833 = 0,0069 in
example: Shape Name window for cropped image

- Developer – Shape Name
- Cropped image is still a “Metafile”
- i.e vector based image which can be zoomed in and out without deteriorating image quality
Conclusion
Another Visio mystery solved. While not a perfect solution, good enough for me.
Is cropping worth the time and effort required?
It is up to you whether you want to take the time penalty with manually positioning metafiles with slack space around them or spending some time getting rid of slack space around metafiles to get ability to position the shape by using formulas relative to parent shape.
